Custom Shaft Assembly Weldment for the Machinery Manufacturing Industry
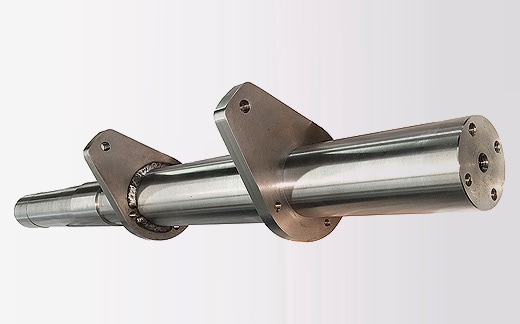
At Tracey Gear & Precision Shaft, we manufactured the shaft assembly weldment shown here for a machinery manufacturer in the Western US. With our 70+ years of experience in supplying customers with critical parts and assemblies, we understand all of the dynamics associated with the production of tight tolerance part families. This project in particular was especially challenging and highlights the breadth of our integrated production services.
The parent component of this project is a shaft with an overall length of 42.56” and diameters of 3.000” 3.250”, 3.280”, 3.000”, and 2.941”. Machined from 3-3/8” stock, the design also included a keyway and a number of threaded and non-threaded holes in the shaft ends as well as .03” x 45° chamfers. The child components included two ears that are machined from 1018 cold drawn flat stock. These parts were a very important facet of this project, and as they are welded to the shaft the critical alignment tolerances are a challenge to achieve.
To obtain the level of quality and precision required, the shaft was turned on one of our large CNC lathes, while the ears were machined using one of our Hass VF mills which was followed by face grinding to obtain high precision flat and parallel surfaces. Once all of the parts passed dimensional inspection, we installed screws into all of the threaded holes as protection during close proximity welding. Each ear was then butt mounted on the shaft, and checked for position, and then tack welded on the inboard side and checked again. Once perpendicularity of the ears was verified we performed distortion-free finish welding to ensure the assembly’s mechanical strength.
Our quality technicians carried out visual and dimensional inspections at all critical phases of production as well as a final inspection. These quality investigations confirmed that we upheld ±0.0005” dimensional and ±0.5° angular tolerances required for ear alignment.
To learn more about the milling, welding, and grinding processes we used to produce this shaft assembly weldment, contact us today.


